Sunday, June 24, 2012

Tango Brew Buns!


I needed a decent burger bun for a YouTube burger contest hosted by Ballistic BBQ. I found a recipe for a beer bun that sounded pretty darn good so I did a little adapting and came up with this. Guinness gets these burger buns off to a great start!

Ingredients
2 tsp yeast
1/4 cup warm water

2 Tbsp Agave Nectar
1/4 cup Olive Oil
1 Bottle Guinness / room temp and flat
3 Cups Whole Wheat Flour (plus more, if necessary)
1 1/2 cup All-Purpose Flour
1 TBS Non-Diastatic Malt Powder (optional but oh so good)
1/2 tsp Salt
Pinch Sugar
1 tsp Tango Spice Southwest Sunset

1 egg
Sesame seeds, Poppy seeds, Flax seeds or rolled oats, for topping

Instructions
Sprinkle yeast over warm water in the bowl of a stand mixer fitted with the dough hook and let sit for 10 minutes.

Add agave nectar, oil, and Guinness. Add dry ingredients mix by hand until well combined.

After the dough is mixed well, turn to medium speed and knead for 5-7 minutes (adding additional whole wheat flour 2 Tbsp at a time if necessary) until sides of the bowl are cleaned and the dough is smooth and elastic.

Place dough in a lightly oiled bowl and cover with plastic until it doubles in size. 
Turn dough out onto a floured surface and divide in half.

From one half I formed 3 buns and from the other half I formed two buns. Place buns 1/2 inch apart on a lined baking sheet and cover with oiled plastic wrap. Let rise for 45 minutes.

The three smaller buns turned out to be the standard size roll, the larger two are just under twice the size.

Preheat oven to 375. Whisk the egg with 1 TBS warm water.

Brush the buns with the egg wash and sprinkle with seeds or oats, or both.

Bake for 15-20 minutes, until browned. 

Remove from oven and transfer to a rack to cool completely before slicing.

These rolls were amazing!

As Always, Thank You For Reading!

Tuesday, June 19, 2012

Clam Scape Bacon Explosion!


Sunday June 17th.
Father's day was a nice and relaxing one. A little yard work, some cold beer while playing some horseshoes and some chicken and a new fatty recipe on the WSM.
Good times, good times.
Here is how the fatty was put together this time.

Clam Scape Bacon Explosion.

Ingredients:
1 TBS Butter or Bacon Fat
1/2 Cup Chopped Garlic Scapes
1/2 Cup Chopped Red Onion
1/4 Cup Chopped Jalapeños 
4 8oz Can Chopped Clams /drained
1/2 Cup Crushed Kashi Cereal
2 TBS Yellow Mustard
1 Cup Shredded Cheddar Cheese
2 Ortega Roasted Chile Peppers / drained

1 Lb Bacon
1 Lb Hot Italian Sausage / bulk style, not links

Directions:
These are rather typical directions for making a 'bacon bomb'.
Spray the inside of a one gallon zip lock bag with PAM. Using PAM inside the bag helps it to release later. Place sausage inside of the bag and flatten out evenly. Leave the zip open to let the air out. Place in fridge.
Heat the butter or bacon fat in a skillet to medium high. Sauté the scapes, onion & jalapeños for 2 to 3 minutes, then add the clams. Stirring constantly, cook for 3 to 4 minutes then add the Kashi. Turn off the heat and stir until all the moisture has been absorbed by the Kashi. Set aside to cool.
Once the filling has cooled completely mix in the mustard and the cheese. Incorporate well.
Lay out a large piece of saran wrap and lay out your bacon weave. You can sprinkle your favorite seasoning on the bacon, if you wish. Cut the edges of the one gallon bag away and lay the square sausage patty on the bacon.
Here you can either spread the clam scape mixture out on the sausage or put the mix into a 'fatty piston' and shoot the goodness out in a log. This method works great, giving you a nice filling.
Now all you have to do is roll it up and get it on the smoker.
I smoked this one for about two hours at 250, then spread some bbq sauce on it, letting it cook for about another 20 minutes to set the sauce. 
The combination of the hot sausage, the spicy clam filling and bacon was darn good.
It is becoming obvious that you can put just about anything inside a fatty and it will be good.
Enjoy!

A Few Simple Ingredients

Scapes, Jalapeños & Onions

Saute For A Bit

Add The Clams

Season With Some Hot 2 Trot

Squirt Some Yellow Mustard

Get Your Sausage On The Bacon

Add Those Ortega Chiles

This Is What A 'Fatty Piston' Can Do

Nice Filling

Ready To Smoke!

Season Once Again

Getting Crispy

Look At That Sauce

Looks Like A Giant Next To The Chicken Thighs

Nice!

All Smoked & Ready

Perfection!

As Always, Thank You For Reading!

To learn more about the Fatty Piston, read this from Cowgirl's Country Life.

Thursday, April 12, 2012

JB's Spring Fling!


The last weekend of March we here at Tango Spice headed out down to Louisiana to meet up with a friend of ours, YouTube legend JB!

Yep, that is right, once we heard the shout of for good eats from JB we knew it was time to head on down to Baton Rouge for a great time with some awesome folks!

Joe from Haftafish was there from Mississippi, as was Ed from Lubbock, Texas and Daryl rode his motorcycle all the way from Cincinnati just to be part of the festivities.

You can bet we will back again next year!


As Always, Thank You For Reading!

Monday, March 26, 2012

Dutch Oven Carnitas!!


This weekend here on Long Island was cloudy, chilly & rainy. Hey, why not, it's Long Island. At least I am not out there shoveling snow!

I had planned on trying my hand at a dutch oven recipe that I had seen on the youtube channel of Outdoor Cast Iron Cooking. Dean & Joanie have many excellent videos, all about 'cooking in the great outdoors'. Every video is filmed at some cool location while cooking some awesome food.

When I saw how Dean whipped up some pork carnitas I knew I had to try it out. Here is how it turned out, on a rainy Sunday in March.

The method was Brown - Braise - Broil.

This is a rundown of what & how:
Note! For the braising portion of this cook, Dean used charcoal. As this is my first attempt at a long Dutch Oven cook and I did not have a covered area to use charcoal out of the rain, I braised using a propane burner. I know, lazy huh?
I used a 12" Dutch Oven

Ingredients:
4 lbs Pork / cubed / from a large loin I found on sale
Tango Spice Chik N' Rib Rub
1 cup Dr Pepper
2 Oranges / sliced
2 Ancient Sweet Peppers / split & seeded
Some small onion / peeled
Cooking Oil

Browning Directions:
Place cubed pork on a parchment lined surface, coat with Chik N' Rib Rub (or your seasonings of choice) Then place in a a non reactive bowl.
Add enough cooking oil to cover inside bottom of dutch oven and preheat.
Add the pork in a single layer & brown both sides, turning once. This will take two or three batches depending on how much meat you have.
Remove browned meat, place in a separate bowl, brown the remaining meat.
Remove second batch of meat to the bowl with the first batch.

Braising Directions:
Scrape the brown bits left over with a wooden spoon, loosening them.
Add Dr Pepper & place pork meat into oven.
Place orange slices on top of meat and the split peppers on top of the oranges.
Add enough water to bring liquid level up to the top of the pork mixture.
Cover and braise for 2-3 hours until meat is tender.
After about one hour, remove the peppers, as they will be very tender. Remove the skin and use the pepper flesh to make a spicy paste*
After another hour, check the meat for tenderness. When you feel it is ready to shred, remove the pork from oven and place in a large bowl.
As you near the end of the braising time, start a full chimney of charcoal for the broiling portion.
Discard orange peels and remove the onions.
While meat is cooling, reduce braising liquid by two thirds, boiling and stirring using high heat.
While that is reducing shred pork.

Broiling Directions:
Remove the oven from the heat, place on a heat safe surface.
Place shredded pork back into oven, stirring it into the braising liquid.
Cover and broil meat for 10-15 minutes using a full chimney of coals on lid.
Once it becomes browned on top, remove lid from oven and discard coals.
Enjoy.

The meat was insanely good! This method does differ from Dean's so please check out his video for his version. You have to try this, it is SO GOOD!

Spice Up The Pork

Brown It

Add The Oranges

Top With Peppers

The Aroma Was Amazing

Shredded Perfection

Top The Lid With Hot Coals

Wow, Look At That

Dig In!


As Always, Thank You For Reading!


Saturday, March 3, 2012

Irish Barm Brack Bread


Greetings everyone and welcome to March 2012! Spring is just around the corner and Saint Patrick's Day is fast approaching! Around this time of year I search around for some new recipe to try, or even several recipes that will 'Get My Irish Up'!

I will admit that I have no interest in cooking 'corned beef and cabbage' as presented over the years. How over played is that tune? This is a day for celebration and who really wants to celebrate with with boiled meat and soggy cabbage? No offense meant to those who like the 'traditional' way it is cooked here.

In trying to expand my playlist for for St. Patty's Day I am going to see how many new things I can try this year. It is during the search for new & exciting I found the following recipe, and I am pleased to share it with you now.

Barmbrack is a tea bread popular in Ireland, especially around Halloween. I am presenting here because it is a great bread for any time of year and is a much more welcomed addicting to a Saint Patrick's meal that soda bread. Being a sweet rather than savory bread it can be eaten with a meal or as dessert or breakfast bread. Once you try it you are going to want it all day.

Makes one 8-inch round loaf


Ingredients
16 oz Long Ireland IPA (India Pale Ale)
2 Cups Dried Fruit / small fruits - raisins, golden raisins, cranberry, etc

1 Cup Milk / lukewarm (110-115°F)
2 1/4 tsp Yeast
2 tsp Sugar

2 1/2 Cups AP Flour
1/2 Cup Whole Wheat Flour
1/4 cup Sugar
1/2 tsp Cinnamon
1/2 tsp Ground Cloves
1/4 tsp Nutmeg

1 Egg / beaten
1/3 Cup Unsalted Butter / softened
1 tsp Salt

Method
Place the IPA and dried fruit in a bowl and let soak overnight.
The next day when you start to gather your other ingredients drain the fruit and spread them out on paper towels until needed.
In a small bowl mix the yeast, warm milk and 2 teaspoons of sugar together and set aside for 5-10 minutes to activate the yeast.
In a large mixing bowl, sift together the flour, sugar and spices. Make a well in the center of the flour and add the yeast mixture, beaten egg, butter and salt. Stir with a wooden spoon to mix the ingredients and bring the dough together. Add a little more flour if the dough is too wet or a little more milk if it is too dry.
Remove the dough to a floured work surface and knead for 5-10 minutes, or until the dough is smooth but still a little sticky. You can also use a mixer and dough hook, which is what I did, as I was lazy that morning. Setting 2 or 3 is fine, for 8 to 10 minutes.
Add the dried fruit a little at a time into the dough and knead until all the fruit has been incorporated.
Remove the dough to a large, lightly buttered bowl. Cover with a clean towel or plastic wrap and set in a warm corner until doubled in size, about 1 to 1 1/2 hours.
Remove the dough to a lightly floured work surface and punch down to deflate. Knead lightly for 2-3 minutes. Form into a ball and placed in a buttered 8-inch cake pan. Cover with a towel or plastic wrap and let rise again until doubled in size, 30-60 minutes.
Preheat oven to 400°F. Place the loaf in the oven and bake for 35-45 minutes, or until top is browned and sounds hollow when tapped. If bread starts to brown too quickly tent with foil.
Remove to a rack and cool.

The entire time, from needing to baking the bread had a wonderful aroma. This is a very tasty loaf of bread, something you can enjoy any time of the day. Pop a slice in the toaster and spread with a little butter and you have a very yummy snack.

Variations
Just before baking, brush the top of the loaf with a mixture of 1 egg yolk and 3 tablespoons of milk beaten together. This will give the loaf a dark shiny crust.
Many barmbrack recipes call for "mixed spice." This could be equal parts ground cinnamon, cloves and nutmeg. Ground allspice can also be used. I will try differing spices as I continue to experiment with this loaf.

Long Ireland IPA & Fruit

A Little Left Over For My Glass

Sugar, Cinnamon, Cloves, Nutmeg  & Bran

Drunken Fruit

After First Kneading

After Second Rise & Oven Ready
Baking Away

Time To Cool Down

Wonderful Aroma

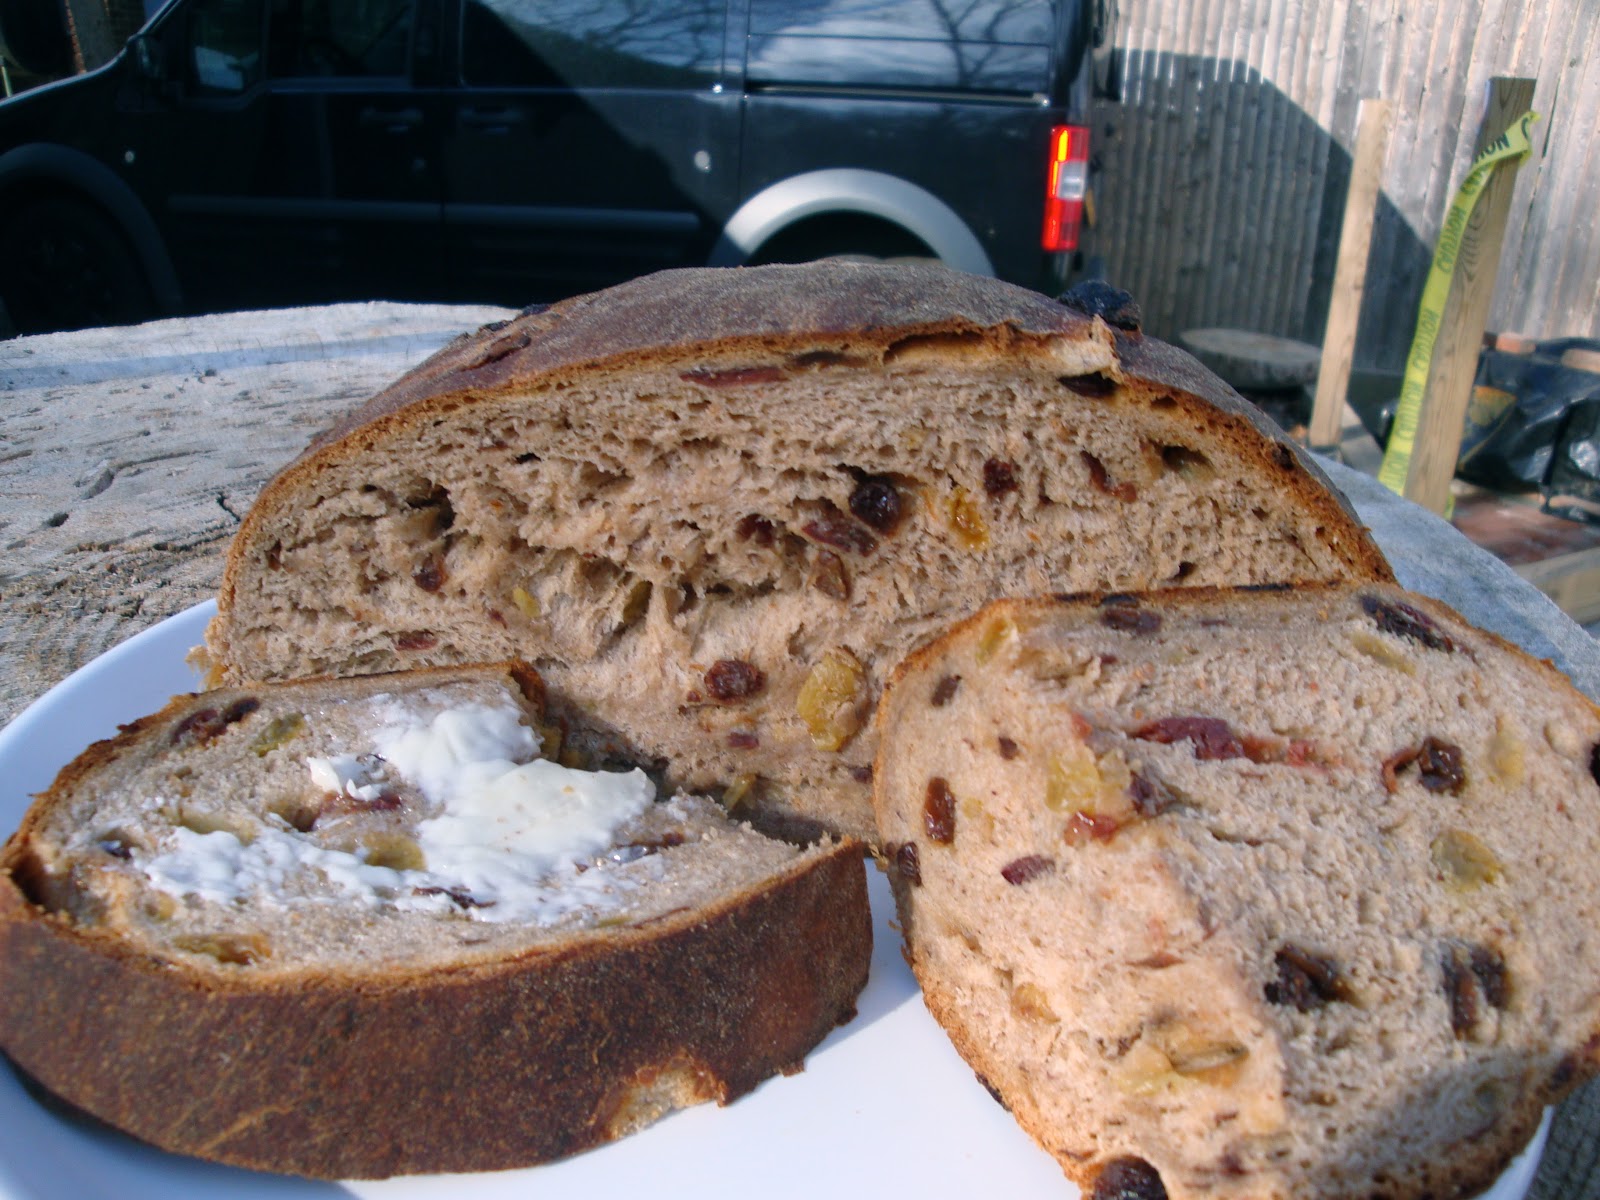
Irish Barm Brack!


Notes
Also known as barm brack, barn brack or baírín breac.
At Halloween, barmbrack is used to tell fortunes for the coming year. A pea, a stick, a piece of cloth, a coin and a ring are all baked inside the bread. The one who gets the pea will not marry. The one who gets the stick will have an unhappy marriage. The piece of cloth fortells poverty, while the coin indicates riches. And finally, the finder of the ring will marry within the year.

As Always, Thank You For Reading!


Monday, February 20, 2012

15 Bean & Rib Soup / Stew!


The weekend before last here on Long Island the cookout day was downright COLD - temps in the 20's were tough, but we dealt with them and cooked outdoors. This past weekend the weather did bestow upon us sunny skies and temperatures in the 40's. The winter to spring change is in the air and 'unsettled' will be the forecast for a couple of weeks.

On Saturday I decided to do some more cooking with the new wood burning stove we are getting set up in the back. So far this has been a real good yard sale purchase. Not a bad way to let go of 20 bucks.

On the menu for the day was 15 bean soup. I had score a package at the store, because 15 beans sounded like a good number to me at the time. After watching a 15 bean video over at JB's YouTube Channel, I new I had to have a go at some bean soup. This was just any bean soup mind you, there were all sorts of other ingredients to add to this pot of goodness. I think it ended up being more of a stew than a soup. It's all good though, the aroma of this concoction was surely wafting about the neighborhood and everyone just wanted a bowl.

The main addition to the dish was cubed BBQ rib meat. Last weekend I smoked three racks of ribs, two of which went that night. The third one was saved for a future meal. This is that meal. Some places such as Restaurant Depot and BJ's Wholesale sell baby back ribs in three packs, cryovacced together. You really can't thaw out just one or two racks, you are pretty well committed to bbqing all three. Not a problem, left over rule!

Here are the ingredients: 

1 Package Hurst's® 15 Bean Soup
1 lb. Cooked Baby Back Rib Meat / large cubes
1 Large Russet Potato / large dice & skin on
2 Cups Parsnips / skinned & diced
1 Large Yellow Onion / rough chopped
1 Red Bell Pepper / chopped
2 Large Jalapeno / sliced
2 TBS Tango Spice Sante Fe Seasoning

Soaking - Rinse beans once or twice, then place in a large pot, cover with 2 quarts of water. Allow beans to soak overnight, or at least 8 hours.
After soaking, drain excess water, and add 2 quarts of fresh water.
Bring to a rolling boil, reduce the heat and simmer uncovered for 2 hours.
After two hours, add the cooked rib meat and diced potatoes.
Keep and eye on the water level.
After adding the meat, in a separate pan saute parsnips, onion, bell pepper and jalapeno, saute for 5 or so minutes.
Add parsnip mixture, to the beans & simmer for 30 minutes.
At this time add the Sante Fe Seasoning and simmer for an additional 30 minutes.
Taste for seasoning, adding more Sante Fe - just because it is so good!

There you have it. The new stove is working out really well and this soup turned out very darn tasty! It really was a 'go for seconds' type of bowl. I will be trying this again, adding some garlic and maybe using some red onion instead of the yellow. Next time I will also try a different spice blend, just because.

As Always, Thank You For Reading!

Here is the action packed video - enjoy!


3-2-1 Ribs!


This post has to begin with this admission - By no means am I a rib master. Though I have been practicing bbqing and grilling ribs for a while now, I am not there, yet.. Someday, with enough ribs 'under my belt' I will be able to say I bbq some of the best ribs around. Always hold out hope!

As you look around the internet for 'bbq ribs' there are literally thousands of recipes and videos out there of the 'great rib method'. Some of them you can tell right away that it is best to pass them by, but there are many others which pique the interest and get the taste buds attention. One such method is simply named the 3-2-1 Method. I am not going to be able say this is the best way to do them, as I need to try all other way s too. This is one way which wanted to give a try try. To be honest, I have heard the foil portion of this method called 'the crutch'. For me, the end result is what tells the tale. If you end up with the best ribs you have ever eaten it's all good.

The basic premise for 3-2-1, from what I have read, is the following. This is a low & slow cook.
BBQ the prepared ribs for 3 hours
Place ribs & a little liquid in foil, put back in bbq for 2 hours
Remove from the foil, slather with sauce and back in bbq for 1 hour

This is the breakdown of how these ribs went from fridge to plate.
I started the smoker at about 8:15, heading for a temperature of 225 degrees by 9 am. This was tricky as it was only around 22 degrees outside. Just glad there was no wind. Of course, the trickiness was taken down a notch by using the propane option on the Brinkman offset. Have to say that having the option of going from stick burning to propane and back is very cool.
I prepped the ribs by first removing the membrane from the back then coating both sides with spicy mustard. After that a nice coating of our Tango Spice  Chik N' Rib Rub. Of course, any mustard and rub will do, but Tango is better than most - if I do say so myself. As the bbq came up to temp I  left the ribs out on the counter, covered with plastic wrap so they come to room temp before being placed in the smoker.
Once the smoker is at the desired temperature place the racks on the grates, bone side down. These I let go for just about 2 1/2 hours with the temp hovering between 220 & 225 degrees.
During this initial cook time I used a spray bottle and gave the ribs a good hosing with 100% apple juice every thirty minutes.
As the 2.5 hour time neared I ripped off three large pieces of foil, opened a bottle of Long Ireland Black Friday Imperial Stout. Placing a rack on each piece of foil, I formed a sort of bowl and added around a quarter of a cup of stout to each. Sealed the foil, but did not make it too tight. These were then placed back in the Brinkman.
The 'original method' calls for leaving them foiled for 2 hours but I decided to unfoil them after just 90 minutes. Some of the naysayers I had read voiced complaints about the ribs over-cooking, possibly turning out a bit mushy. So, to ere on the side of caution I had been cutting back a bit on the times. 
At the 90 minute mark the ribs were removed from the foil, put back in the smoker and coated with a generous helping of bbq sauce.
Here I did leave them to bbq for the entire 1 hour - again @ 220 degrees. At that point I took them off, placed them in a chaffing pan and covered with foil. Turn the smoker off and get ready to slice into these racks of goodness. The entire cook time was scented with the wondrous aroma of bBQ and by this time I had a mighty hunger.

I will say right up front that the ribs tasted awesome, but were far from the best I have ever cooked or had. They were cooked real well, but were just shy of the 'fall off the bone' that I enjoy. One thing I am thinking is that I could have done the entire 3-2-1 as it stood and not take 30 minutes off the starting 3 hours or 30 minutes off the foiled time.
So, this means that I really must bbq many, many more racks of ribs!
No Problem!

Also, I have to say the Long Ireland Black Friday Imperial Stout was Fantastic on the ribs and in the glass!

As Always, Thank You For Reading!

Check out the video of this tasty event!