Tuesday, October 25, 2011

Plankin' The Rib Eye!


This past Sunday was one of the few glorious days we have had this year, and for 2011 glorious means that there was no rain. It was a perfect fall day for raking leaves and stokin' up some charcoal. Dinner was going to be baby back ribs so the outdoor test kitchen was in full swing early.

While the Brinkman offset was heating up I figured a little lunch on the Weber would be a great idea. Once again it was time to grill a big rib eye on a cedar plank. This time it was going to be a very thick 'slice' weighing in at a respectable 33 ounces!


To start I soaked a 15" X 5" X 1/2" plank in water for three hours. No specific reason for that time limit other than I remembered to put the plank in the water three hours before I was going to start the charcoal.

Before I started the charcoal the rib eye came out of the fridge and was lightly coated with Tango Spice Midnight Espresso. The last time I tried this combination the aroma and taste of the cedar worked like magic with the brown sugar, espresso ancho chile & coriander of the Midnight rub.


The charcoal of choice was Kingsford in the blue bag, one chimney worth. Got that fired up and poured it into a charcoal holder in the center of the Weber 22/5, placed the grates back on, and closed the lid. Once the temperature reached 520 degrees I placed the plank on the grill to heat up. It took just a minute on each side to heat up and scorch the plank. Once that was done moved it to the side and got ready to sear the rib eye. One minute thirty seconds per side to get nice grill marks and onto the plank it went.

This being such a large cut of beef it was going to take a little longer than a 'normal' rib eye. A temperature probe was inserted and the grilling commenced. The temperature in the weber, with the lid closed and vents opened hovered just around 500 degrees. At this temp you could smell the beef & cedar aroma and hear the plank cracklin'.


Once the rib eye was on the plank, it took 28 minutes to reach an internal temp of 130 degrees.

After a couple of minutes rest it was time to slice into this lunch time treat. As the knife slid through the meat you could really smell the Midnight rub & the cedar! The taste was amazing, everything a rib eye is supposed to be.


The grilling planks are still new to me and I have been having fun with them for sureI can see trying many different food stuffs on them, really stretch their capabilities. I also highly recommend Natures Choice Grilling Planks, so head on over and see Larry today!

As Always, Thank You For Reading!

Friday, October 21, 2011

Plank For The Win!


Well, well, it seems that the judges were liken' the idea of planked Twinkies for a grilled dessert!

I want to thank Allen AKA bbqsmoker over at BBQ4Smoke on YouTube once again for sponsoring such a fun contest.

I also have to thank Larry over at Nature's Choice grilling planks for the incredible prize of cedar planks and a cook book. This was way more than I was expecting. Here is a list of what was in the prize pack!

6 pcs. 8"L X 5.5"W X 1/2" Thick
6 pcs. 12"L X 5.5"W X 1/2" Thick
6 pcs. 15"L X 5.5"W X 1/2" Thick
2 pcs. 12"L X 5.5"W X 3/4" Thick
2 pcs. 15"L X 5.5"W X 3/4" Thick

I have already tried one of the planks for grilling up a 28 ounce rib eye steak. Oh wow, the aroma and flavor is amazing!

If you are in the market for a great cedar plank, head on over and see Larry today!

As Always, Thank You For Reading!


Tuesday, October 18, 2011

Cast Iron Pizza!


This past Sunday was a really nice day. After a few days of rain (what else is new?) the dawn was as cloudless as it could be. A slight breeze from the south meant we were in for a rather warm October day. I started to plan lunch a little early because I was going to try my hand at making pizza in a cast iron skillet.


I know that folks have probably been doing this for many years, but it is a new concept for me. There are two blogs where I had read about this method and I had saved both for future testing. Well, Sunday was the day! I will list the two blogs at the end, please go check them out!

Here are the ingredients which I put on the pizza crust.
A mixture of Restaurant Style brand bbq sauce & Frank's Sweet Chili Sauce
A heaping mound of baby back rib meat from a previous bbq
Fire roasted orange & yellow bell peppers
Fire roasted jalapeno peppers
Lots of fine shred cheddar cheese! 

As for the crust, a simple one will do nicely.

3/4 cup Lukewarm Water
1 TBS Olive Oil
1 tsp Salt
1 3/4 cups AP Flour
1/4 cup Semolina Flour
2 tsp Instant Yeast
1 tsp Baking Powder
Mix and knead all of the ingredients to make a smooth, pliable dough. Cover the dough and let it rise at room temperature for 30 minutes
This can also be put the refrigerator for a few hours or even overnight. 

While the dough was rising I roasted the peppers over a bed of hot coals. I like to slice the bell peppers before roasting them so both inside and out can get a good char on them. They turn out a little drier that way too, which I find better to work with and the seeds are already removed.
Also, this was the time to start the Sweet Home Pellet Grill and get it crankin' to 425 degrees.
Once the dough had risen I placed it in a 12 inch cast iron pan. I did lightly spray the pan with cooking spray. Once all of the ingredients were piled high it was time to heat the pan. This I placed on one of my butane stoves, set it to high and let it fire up for three minutes.
At the three minute mark it was onto the pellet grill.
18 minutes later it was done. I let it cool a little, slid it out of the pan and enjoyed a super lunch!
This method is good indoors as well, so you can use your stove and oven.
Please give this a try, then let me know how you enjoyed it!

Here are two blogs for your reading pleasure...


As Always, Thank You For Reading!
www.tangospice.com
www.youtube.com/TangoSpiceCompany


Tuesday, September 20, 2011

Planked Twinkies


The Following Recipe Is From A Video Response For A BBQ4Smoke Plank Grilling Contest!

Allen over at BBQ4Smoke is hosting a plank grilling contest this month over at his YouTube page. The prizes he has for the contest are in line with the title of the contest, each winner will be set up with some high quality planks from Nature's Choice.

For this contest I decided to go with a dessert item that I had done once before and it is just strange enough to perhaps get me some votes.

Ladies & Gentleman - May I Present…

Planked Twinkies!


Ingredients:
Twinkies / one per person
Tango Spice Southwest Sunset / or standard chili powder
Nutella Hazlenut Spread
Heath Toffee Bits
Hydrox Cookies / broken
Mini Marshmallow / pinched in half

Before you start to assemble your Twinkies set a cedar plank in a pan of water for about 30 minutes, remove and set aside.
Now start a chimney of charcoal, then start your dessert build.
One key to help make these easy to prepare is put the Twinkies in the fridge to cool off and stiffen the cake a little bit. This helps spread the Nutella spread more evenly.
In a small bowl put 2 TBS of Nutella, stir it up real well to get is smooth, then add 1 tsp of Southwest Sunset. Stir to blend that well.
Spread an even layer of the spicy Nutella on the Twinkie.
Press a little of the Heath bits into the Nutella, then add the cookies, then press in the marshmallows.

When the coals are ready, pour them into your grilling vessel, place the grill down and put the plank on the hot part of the grill. Put the lid on and let the plank get good and hot, about 5 minutes.
Once the plank is hot, slide the Twinkie onto the plank, replace the lid and let the heat work its magic. After 2 minutes, lift and check, replace the lid if the marshmallows are not browned. These are done when the marshmallows are just the way you like them.

Remember to use a glove or a pair of tongs to lift the plank, IT IS HOT!
Set it on a burn proof surface, and let it cool for a minute, then slice and enjoy the most unhealthy dessert you can imagine - it is SO GOOD!


Monday, September 12, 2011

Scotch Midnight Shell Steaks


Greg over at Ballistic BBQ is hosting a grilling contest this month over at his YouTube page. The prizes look very cool and video showdowns are always a hoot so I knew I had to through my tongs in the ring of fire and give this one a go.

For this contest it could be anything as long as it is cooked over fire. I had seen a recipe a while back for bone in rib eye steaks which I decided to change up a little and grill me up some shell steaks. Just using some pretty basic ingredients as well as our own Tango Spice Midnight Espresso and it was off to the grill races. Here is the low down.

Scotch Midnight Shell Steaks

Marinade:
4 OZ Dewar's Scotch Whiskey
2 TBS Ketchup
1 TBS Olive Oil
1 TBS Soy Sauce
1 TBS Malt Vinegar
1 TBS Minced Garlic
1 TBS Tango Spice Midnight Espresso

2 12 oz Bone In Shell Steaks
2 TBS Olive Oil

Directions:
In a nonreactive bowl combine the first seven ingredients, mix it real well. Allow that to sit for 15 to 20 minutes so the spice and the whiskey can work some magic together.
Place the steaks into a one gallon ziplock bag, add the marinade. Put them in the fridge for at least an hour, but not more than two hours.
After taking the steaks out of the fridge remove from the bag and discard the marinade. Pat the steaks dry. Lightly coat the meat with a little olive oil then a light dusting of Midnight Espresso. Cover and allow to come to room temp.
Place the teaks on a hot grill and cook the best way you know how.

I hope you enjoy this recipe so much that you write to me to let me know!

Here is some live action from the grill!


Sunday, September 11, 2011

Pork Rib Pie


Pork Rib Pie

Sometimes when you open the fridge you are greeted by a nice array of left overs from great meals past. Such was the case this weekend so it was time to do a little something different with what I found.

In the coolness of the fridge was some smoked cabbage from an earlier post. There was a few red taters which did not make it into the potato salad a couple of days ago. There was a ziplock bag full of rib meat from a few racks of baby backs. Yeah, this was all starting to add up!

I was inspired to make this meal by a posting on Cowgirl's Country Life, one of the best blogs out there in my opinion. It was there where I read about her Pulled Pork Pie. Once I put two and two together I knew what was for dinner.

Here is my version of this soon to be classic!

Pork Rib Pie

Hear That Sizzle

Red Taters w/ Tango Spice Cajun Rub

A Layer Of Smoked Cabbage

Add That Great Rib Meat

Slather On Some BBQ Sauce

Lay On Some Romas & Jalapenos

Even Better With Cheddar

Lace Up The Bacon & Sprinkle With Cajun Rub

Lil Smokey Luvs The Pie

Cookin' On The Weber w/ Bricks

Ready To Dig In

One Plate Of Goodness


Thanks for taking the time to stop by for a read.

Joe Tango @ Tango Spice

Wednesday, September 7, 2011

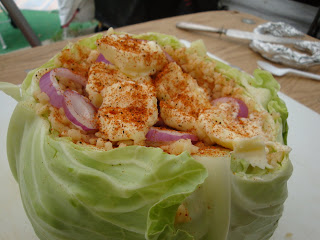
Smoked Cabbage


Over the weekend it was all about yard work and bbq. Both of these are great when the weekend it nothing but sunny skies and cool breezes.

Monday was another perfect day for smoking up some ribs so the smoker was prepped and a few racks of baby backs were put to the smoke. Since the Brinkman was chugging away I thought it was a good time to revisit something that I had seen over on the Grillin Fools website a while back.

Smoked Cabbage.

This dish looked so good the first time I saw it that it was not more than a couple of days before I had tried it the first time. Smoked Cabbage makes a wonderful side dish and is just different enough so there is a good chance that your dinner guests have never heard of it, much less tried it. A few simple ingredients, some room on the grill racks and some charcoal is all ya need. Of course you can use a gas grill or even your oven, all you have to do is adjust your cooking times a bit.

The smoker was running at about 250 ish degrees, which works well for this.

Ingredients:
1 Large Head Cabbage
Tango Spice Southwest Sunset
Minced Garlic
Red Onion / thinly sliced 
Butter
Mozzarella Cheese / shredded

Foil

Directions:
Take a piece of aluminum foil and twist into a ring which will become a base for the cabbage, allowing it to stand up during prep and cooking.
Cut the core out of the head of cabbage on an angle, making a sort of a cabbage bowl out of it. Discard the core.
Sprinkle some Southwest Sunset into the cavity, moving the cabbage around to get the spices into the crevasses.
Spoon a tablespoon or more of the minced garlic onto the spiced cabbage, making an even layer.
Lay on as many or as few of the thin onion rings as you wish, the more the merrier.
Put a few pats of butter onto the onion, getting even coverage.
Wrap the cabbage in two layers of aluminum foil. This can go on the grill right away or be placed in the fridge to be smoked later. Remember to remove the cabbage from the fridge at least 45 minutes prior to placing it on the BBQ.
When the temperature of the smoker was at 250 degrees I put the foil wrapped cabbage into the smoker, on the little rind so it was steady and just let it cook away. You can cook cabbage, then cook it some more and it is still tasty. 
After three hours it was time to remove the foil. Carefully take the head out of the smoker, with the ring and place on a hear proof surface. Remove the foil and you will see how the onions and garlic have cooked down and all the butter & spices have penetrated the cabbage.
At this time take some mozzarella cheese and fill the cavity. Do not be stingy, add some cheese and then add a little more.
Now it was time to go back into the smoker for another hour.
When you pull this out, the outer leave and the cheese will have a nice light brown tint and the aroma will be awesome! Slice into it and see all the buttery goodness seep onto the plate.
Please, try this recipe and then let me know what you think!
Thanks for reading.


Five Simple Ingredients 
Southwest Sunset In The 'Bowl'

Top With A Little Garlic (a lot)

Couple Of Onion Rings

Butter & A Little More Southwest Sunset

After 3 Hours @ 250 Degrees In The Foil

Topped With A Little Cheese (a lot)

Back On The Smoker With The Acorn Squash

Next To The Ribs

Yeah Man!

Another Hour Unfoiled

Slice It Open

You Should Smell The Goodness

Nice Plate Full

Friday, September 2, 2011

Hurricane Ribs!


Ribs Ribs Ribs.

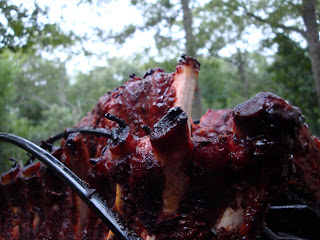
I know everyone does ribs but I just had to share come pics of a couple of racks of baby backs which were nicely done on the Weber last Sunday. 

Yes, these were done last Sunday but it has been a hectic week after the hurricane so posting the prOn was low on the to do list. The charcoal was started as the last of the rains moved through, and as luck would have it, the storm broke up here and but the time the ribs were done the sun was coming out.

Better late than never though huh?

I started out with three rack, membranes removed. Coated these with Chik N Rib Rub and let them sit wrapped in plastic wrap for about 4 hours in the fridge. (we still had power at that time)

After three hours I pulled the ribs out of the fridge to get to room temp.

Into the Weber kettle I put some charcoal in these handy Weber Char Baskets. Luv those things! 25 briquettes each and them set each one on either side of the kettle. With a disposable foil bred pan between them which was half full of water. Started 10 briquettes in a charcoal chimney. When these were ashed over I put five each on top of the unlit charcoal then placed the rack on a rib holder in the center of the grill. Also on the grill I put an oven thermometer. Closed the lid, adjusted the upper and lower vents and let it come to 300 degrees.

After about 20 minutes I added some alder chips to get some smoke going. 

The temperature in the kettle stayed near 300 for 2 1/2 hours at which time I removed the ribs, wrapped them tightly in foil into which I had poured some apple juice. These went back in the Weber another hour. After that hour was up the ribs came out of the foil and were ready for a slathering of BBQ sauce. The sauce used was Roger's Rustic Sunset Heat. This sauce I picked up at the NY State Fair in the Pride Of New York Store. Tango Spice is also stocked in that shop so I like to pick up a few things there to support the other Pride members.

Once the sauce was applied the ribs went back in the kettle. I was keeping an eye on them and when the meat started to pull nicely away from the bone, maybe 50 more minutes, they were once again wrapped in foil to rest. 

After 20 minutes resting time the ribs were unfoiled and looked amazing. They tasted even better.

Yes, everyone does ribs, and we all know why - They Taste Awesome!

Here are a few pics….

Nice Rack

Chik N Rib Rubbed

Sauced Ribs
Back In The Kettle

Looks Ready!

Yeah Man!

Hurricane Ribs!